• Skip to main content
  • Instagram

Matt Clarkson

Photo/Finance/Tech

  • Home
  • Portfolio
    • Entire Portfolio
    • Landscapes
    • Close ups
    • Urban/Other
  • Articles
  • Resume

Matt Clarkson

Mar 25 2021

Starting a successful labor business in high school.

Intro: Making money in high school can be an absolute pain in the back end, especially for those of us who just really don’t like the idea of working at a fast food restaurant or a grocery store. I know for me personally I couldn’t stand the idea of having to deal with the whiny general public for hours on end just to make minimum wage; I instead much preferred the idea of being able to work mostly alone, on my own terms, and better yet, outdoors. If you are like me and think that packing grocery bags with Cocoa Puffs or fetching people their 25th packet of ketchup sounds terrible then I think you may well want to give this a read. Labor businesses can be one of the best ways a young person who is willing to work hard can make good money on their own terms. I personally have been doing this for the last year and it has done me well, so I want to give you some tips to start doing the same.

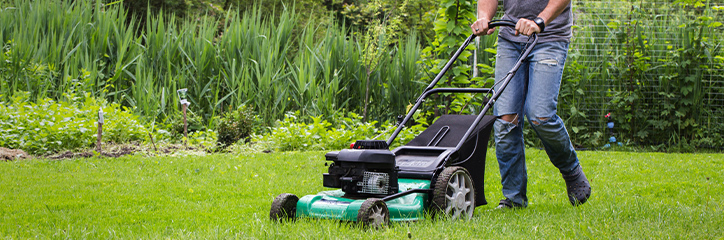
What does a labor business encompass? A labor business can provide a large range of services depending on the needs of the client and the needs in your area. Examples of this would be mowing lawns, raking leaves, basic landscaping, helping somebody move, and so on. What service you end out providing will all depend on a few things such as your skill set, your clients, the time of year, and geographical location. The best way to figure out what services you can offer is to simply take a piece of paper and write down all the different labor type jobs you can do, literally anything and everything. Once you have a long list of things you can do, you then want to narrow it down a bit to what is needed in the current time of year and in your locality. From there you should have a decent size list, 5-10 services is best, and with this list you can now start to create an ad for your business so that people know what you do and that your willing to do it. 

Putting together a high quality ad: Putting together a high quality ad is one of the most important parts of the whole process. Your ad in your first impression so it want it to seem professional and to the point, many people have a tendency to write only a few word or write a few paragraphs, when the sweet spot is really right in the middle around 1-2 paragraphs. By keeping it to 1 or 2 paragraphs you will be able to give the potential client enough info to be interested but not so much they don’t even bother looking. Here are some tips for creating your ad: 

-If you’re a student, SAY SO. People love to be able to help students so mentioning that you are one can help you land jobs, in my experience that especially applies with elders. 

-Next, save your rates for later negotiation, I do not recommend putting your hourly rate in your ad as depending on how high it is it can scare people away before they have the chance to invest their time into talking to you. It is much easier to save rates for later and can lead to you landing more jobs. 

-Finally, tell them you’re willing to learn new skills for a job. Labor work is constantly changing from job to job and eventually you are bound to be asked to do something you don’t yet know how to do. Instead of backing away from this, take it as an opportunity to learn a new skill and tell them you’re happy to try figure it out. It’s good to put this into your ad as it will tell people that you will go the extra mile to get the job done and that’s what people want when they are looking for somebody to hire. Doing this resulted in me learning how to build pathways and drive a tractor, while being payed, so worth it.

Figure out where you want to post your ad: There are countless places you can post ad’s for work and it’s best if you use them all. The more places you post the more calls you’ll get, it’s really that simple. Some examples of places you could post your ad online would be Facebook marketplace, Craigslist, Nextdoor, Instagram, snapchat even. Furthermore, it is a good idea to go onto a website like Canva or another creator to build yourself some business cards and if you want to take the extra step you could also make some infographics and flyers. As we inch towards a more normal non-Covid world these things will be handy to have, so you can leave a card with your client and post your flyers or infographics in local businesses, as well as posting downloaded versions of them on social media.

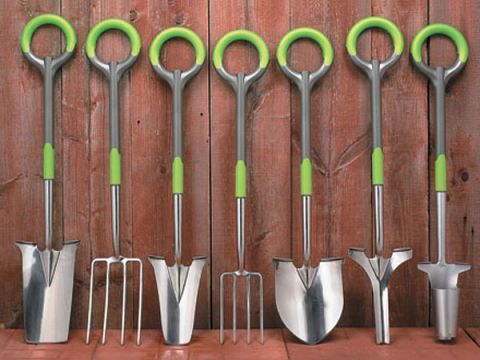
Decide if you will choose to purchase some of your own tools: You may be thinking that you will need to invest a hefty amount of money into tools to start a labor business but in reality that isn’t true at all. Many people have their own tools and are happy to let you use them, this can save you massive amount of money on expensive high quality tools. Just be sure to ask them if they have all the tools for the job before committing, I don’t recommend saying it in the ad as some may see that as a con until they get to know you a little better. If you do want to invest in some tools then the good news is that you don’t need much, to get going you really just need a shovel, rake, dust pan, and some gloves. The rest you can let build with each job, as jobs come up that require certain tools, you will acquire more and more until you end out having enough to cover all the jobs you are presented with.

How to set your rates: Setting your rates is going to be very dependent on your area as your rate is going to be somewhat dependent on your local minimum wage. The key word there is “somewhat,” because if there is one thing I can’t stress enough its that YOUR HARD WORK IS WORTH MORE THAN MINIMUM WAGE; Labor can be intensive work and it can take a toll on your body, minimum wage doesn’t cover that. Unfortunately it’s still not the kind of work you can charge $30-40 an hour for but you absolutely do not have to settle for anything under 15, whether you choose to settle for less than 15 is up to you but don’t forget the value of your blood and sweat. I personally charge $17.50-$20 an hour depending on the job and for that you get a hard working dude with a shovel. 

How to say no to a job: The final thing I want to mention is that you shouldn’t be afraid to say no to a job. In deciding to be a labor worker you are opening yourself up to a plethora of jobs, anything from mowing a lawn to clearing out a nasty old garage full of spiders so you need to be prepared to be asked to do something you don’t want to do. It is completely ok to say no to a job for whatever reason, simply make sure you are kind in your denial and clearly state that you appreciate the offer but are not interested, It really is that simple.

Wrap up: Well that is going to sum up my short guide on starting a labor business while you are young, I highly recommend this to anybody who is looking to make money on their own terms and without the annoyance of the general public. I think this job is especially great for high schoolers and college students as its something you can pick up and put down whenever you need to as there will always be a need for physical labor. So what are you waiting for? Go out there and start digging holes and raking leaves, I guarantee if you follow the tips above you will find work. Good luck!

Recommended products:  If you choose to take the route of getting yourself some tools it’s important you invest in quality tools because they will take an absolute beating. So here are some links to the absolute best shovel, rake, and gloves I have found.

The best shovel in existence, Click Here.

Unbreakable landscape rake, Click Here.

Super tough leaf rake, Click Here.

Work gloves that won’t get torn up, Click Here.

Written by Matt Clarkson · Categorized: Uncategorized

Mar 18 2021

How to begin investing in a few simple steps

Why: Investing can seem like an extremely daunting and risky task from an outsiders perspective. To many it appears to be something that either they can’t afford to do or don’t have the knowledge to navigate. This unfortunate truth has lead to many people ignoring it all together when investing nowadays is something that can’t be ignored, ESPECIALLY by the younger generations. Why? Well the youth have a lot more to consider when it comes to their future and retirement, there is a large chance that for many of us when it comes time to retire social security will be long gone. Furthermore, interest rates are extremely low right now meaning that simply leaving your money in a high interest savings account is no longer sufficient. So how can we encourage the youth to begin investing when so many say they don’t know how? Well, let’s go through a simple beginners guide on how to invest. I will walk you through the steps to set up 2 different types of brokerage accounts, how to navigate them, and give you some information on making your first trade. The only assumption I will make about your knowledge is that you know what a stock is, if not I will be making another article on that soon.

Choosing a brokerage account: To begin your journey in investing you first need to choose a company through which you will invest. These companies are called Brokerage Firms or put into simple terms, you give them your money and in return they give you stocks. Through a brokerage firm you create what’s a called a Brokerage Account, this process is super similar to opening a savings account with your bank, the key difference being that you can buy and sell stocks straight from a brokerage account, while you cannot with a savings or checking account. There are hundreds if not thousands of brokerage firms across the world making it difficult for some to make a choice on where to open their brokerage account. For this guide we will focus in on 2 of the most popular brokerage accounts currently used in the United States, that being Robinhood and Acorns. These two companies have essentially made it their mission to make investing as easy and painless as possible, taking all the hard work out of buying and selling stocks and sparking a passion for investing within millions of people. I use both of these companies myself and can say that they do a great job of simplifying what once seemed too complicated. The key difference between these two accounts is that Acorns automates the whole investing process, while Robinhood does not. In other words, with Acorns all you have to do is decide how aggressive or defensive you would like your investments to be, deposit money, and let Acorns do the rest for you. While on the other hand, Robinhood allows you to search a massive catalog of stocks, ETF’s, Index funds, and cryptocurrencies (Will get into what each of those are later.) and leaves it to you to choose exactly where you want to invest your money. Acorns requires much less time and research spent but also limits your options and leaves less room for personalization, Robinhood allows you to diversify much further and personalize your portfolio as you like, but in most cases requires some market research and a bit more effort, got it? So at this point, if you’re going to follow along with the guide you need to think to yourself, do I want to keep this easy and effortless, have it done for me? Or do I want to dive deeper and learn more about where I’m putting my money and why? If your answer is that you want to keep it plain and simple, Acorns is going to be the better option. If your answer is that you want to dive deeper, Robinhood is definitely going to be a better choice.  To sign up for Robinhood here to receive a free stock work up to $500 click here. To join Acorns and receive a $5 sign up bonus click here.

Signing up:  So now that you’ve figured out which account is best for you, let’s see what you’re going to need to sign up. The process to set up a brokerage account is going to be pretty similar across the board, with some requiring a few more supporting documents than others. The sign up process can be broken down into 4 bits, personal information, supporting documents, bank information, and a short wait for approval, not necessarily always in that order. Both accounts featured in this guide (and all other brokerage accounts) will have you fill out a form with personal information such as name, address, email, and phone number. Next they will need you to provide supporting documents, this will include ID of some form (drivers license or passport) and likely a social security card to verify your social security number. You can simply submit pictures of these items and within a few days they will respond with an approval or denial. The reasons they need these documents are identical to those of a bank, they need to know who you are and how old you are. To open a brokerage account you need to be 18 years of age, now before you stop reading because you aren’t 18 yet, don’t forget to ask a parent if they can make an account that you can use. I personally used a Robinhood account that I had my parent make to start my investing career and if you feel comfortable asking do not hesitate to see if you can do the same. Back to creating your account, the final thing you will need to connect is your bank account so that you can initiate transfers back and fourth between your savings account and your brokerage account. Once all of this is complete you will encounter a short wait time for approval of your account and that’s it, you’ve now created your first brokerage account. From here on out navigating each app becomes a little different so I will start with Robinhood then move to Acorns.

Jan
Robinhood home page, this will be referred to^

Basic Robinhood app navigation: Navigating the Robinhood app is relatively simple for beginners as you only have to pay attention to a handful of buttons to get going, the rest we can dive into later. So let’s begin with breaking down the home page, the page you see in the picture above. The home page will consist of a few elements, the main one at the top being your current total balance and a graph showing how your investments have done that day. To change the graph so you can see longer term than a day, you have some graph settings as pointed out in the diagram. If you scroll down on this page you will be presented with a news article or app reminder, and below that will be the stocks you currently own as well as the stocks you have saved. I recommend clicking on the box that contains the stocks price and when presented with a menu, select to display price change in percentage, this is by far the easiest way to view the change in price. Thats really all you need to know about the home page, let’s move onto the browse page so you can start adding some shares you want to keep an eye on to your home page. To get to the browse page you simply click on the small magnifying glass icon in the toolbar at the bottom, you will be presented with a page where you will be able to search for stocks, index funds, ETF’s and cryptocurrencies; the browse page is also an awesome resource for news pertaining to the stock market, I recommend checking this page anytime you are wondering why the market is up or down. To search for a stock simply click the search bar and either type in the name of a company you know or the tag for a certain stock you’ve heard of. Stock names are often shortened into 3 or 4 letter tags due to companies having long names, for example Apple is, AAPL. If you can’t find a company by entering its name you should first check google to see if the company is publicly traded, then look up it’s tag and enter that instead. Finally we will look at the account page. The account page is pretty important as its where you will go to withdraw and deposit money, close your account, receive tax documents, or change settings. The account page is easily found by clicking the far right button in the tool bar at the bottom. To deposit or withdraw money, simply hit transfers, select your transfer type, enter the amount, and you’re off. The whole process with Robinhood is pretty simple though they do give you the option to dig deeper, but what I have just shown you should be enough to get you started. 

Breakdown of Acorns homepage and invest page^

Basic Acorns app navigation: Getting started with Acorns is going to be even easier than it is to get started with Robinhood because Acorns will do the selecting and investing for you. The only thing you really need to know about navigating the app is how to deposit and withdraw money, along with knowing where to go to change the aggressiveness of your portfolio. To begin, you will always start at the home page (labeled on diagram), from there if you would like to deposit or withdraw money you can simply hit the button labeled “Invest for your future,” from there you will see an option called “one time” which is a one time deposit from your bank into your account. The next one is a withdrawal, you can assume what that might be. Directly below the deposit and withdraw buttons you will find a button labeled “Portfolio,” this is where you will be able to change the aggression of your portfolio. That pretty much sums it up for a basic overview of using Acorns. Once you have deposit some money and selected how aggressive  you would like your portfolio to be, Acorns does the rest! Now lets look at your investment options so you can figure out what’s best for you.

Choosing your first Robinhood investment: You’re almost there! Now we will take a quick look at some of the different ways you can use your money in Robinhood. There are countless ways to invest so I will just talk about 3 options that I have personally dabbled with. The first is going to be cryptocurrency, a digital currency different from a stock in that there is no company for you to receive a slice of, rather you are truly putting your money into digital gold coins and watching to see whether their value falls or rises. There is a massive and confusing amount of information to unpack when it comes to cryptocurrencies but put plain and simple, they are extremely volatile (at high risk of large fluctuations) and lack physical backing. The next is going to be buying individual stocks, there are millions of different individual stocks you can purchase and making the decision on which really falls down to research, prediction, and volatility. I know that isn’t hugely inspiring but I as a fellow investor cannot tell you to buy one or the other for the right answer is very dependent on the person. Finally we’ll talk about index funds and ETF’s, which allow you to purchase many small slices of a set of companies rather than investing solely into one company. A prime example of this would be the S&P 500, which tracks the top 500 companies in the United States, by purchasing one share of the S&P you are purchasing one share of each of the top 500 companies, that is an index fund. For those of us who can’t afford to buy one share of each of the top 500 companies, there are wonderful things called ETF’s, which are essentially a slice of an Index fund. Many of these ETF’s are like baby index funds, tracking the top 500 or all companies in the United States and allow people to invest into a significantly less volatile share and a lower cost. With those in mind, you can now do a little but of your own research and figure out where you want to put your money.

Purchase shares: Once you have figured out what shares you want to purchase, you simply have to search up to company or stock name, hit the buy button, select the amount you would like to purchase and just like that you’re off. From here on out the name of the game is continuing to add more omen into your portfolio and purchasing more shares, building your wealth for the future. If you want to automate this process Acorns allows you to do so by setting up what are called recurring investments, these recurring investments will withdraw a specified amount of money from your bank account each week, this allows for your portfolio to grow without you ever really needing to do anything. 

Let your money grow: Well, we’ve come to the end of this guide. You did it! You took your first steps in building investing for your future and I bet it was surprisingly easy. From here I have 2 tips before setting you off on your way, the first is to try not to constantly check the app. It may be very tempting to constantly look at how your money is doing, but I promise this is not necessary as it leads to you panicking anytime there is a bad day; try to check it maybe once a week and when the dips come do not sell, either wait them out or go with my second tip which is to buy the dips. When the market dips is the best time for you to buy, buy low and sell high as they say, rather than considering selling out when the market dips instead try considering purchasing more. In the last 70 years throughout many crashes, the market has stayed on an upward trend and those that didn’t panic sell when the market fell came on out on top, furthermore, those who bought more every time the market collapsed even further ahead. Well off you go, go make some money and invest in your future. If you ever need to refer back to this guide, DO IT! It’s here to help and there will be more similar guides on the way soon. I will have links to sign up for Acorns and Robinhood scattered throughout the article. Thank you and good luck in your investing.

Sign up for Robinhood and receive a FREE stock worth up to $500 here.

Join for Acorns and get a $5 sign up bonus here.

Written by Matt Clarkson · Categorized: Uncategorized

Copyright © 2025 · Site powered by ServeLink · Log in